Squaring Primer Pockets
There are dozens of techniques for preparing match brass for competitions. Some techniques are well known while others remain relatively unknown.
I’ve pretty well always practiced the technique of squaring primer pockets on new cases that I’m prepping for matches or competition. It’s an external process easily done on any caliber case body. The tools required aren’t expensive. Depending on the manufacturer of the case when primer pockets are originally formed they can be either straight or slightly off angle. Punches dull over time and if they are not routinely replaced a small amount of radius begins to form on the punch head after stamping out thousands of cases. This radius is transferred to the bottom corners around the circumference of the pocket. If the primer pockets are consistently the same from case to case then I don’t believe you’ve got much of a problem. If there are minute changes that might be hard to see with a simple visual inspection when you go to seat the primers there might be a variance in how deep they are seated. Or worse they are seated at a slight angle that goes undetected.
Most primers have three legs on the anvils that hold the priming mixture in place. If they aren’t all fully flush against the bottom of the pocket there could be a change in the way they fire or light off. If a primer is seated high, when the firing pin strikes, the primer is pushed forward a little until it rests on the bottom of the primer pocket hole before it ignites.
In automatic type rifles a high primer is not a good thing because they could cause a slam fire. Generally autos aren’t used in f-class so if your interested in discovering what a slam fire is… Google it.
Most of the guys I know shooting f-class use single shot bolt action rifles. Still I believe it’s a good idea that the primer sits a fraction of a space below the top surface of the case head. The amount of depth I don’t believe is a big deal with the exception of cutting the primer pocket too deep. This could inadvertently happen with the tool having an adjustable cutting head. Some tools are configured in this fashion with a set screw so you can move the cutter in and out. You have to make sure you don’t cut them deeper than the length of you’re firing pin projection through the bolt face. In other words if you cut them too deep your firing pin may not strike or hit them. You can visually inspect seated primers. You can physically run your finger over the bottom of the case to feel the indentation or you can sit them upright on a flat surface to help discover any improperly seated primers.
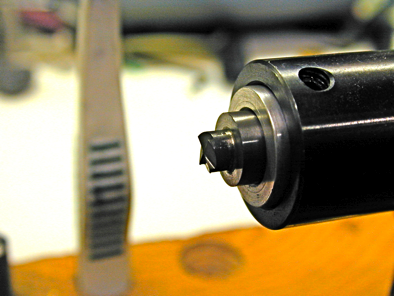
I square them up because it gives a consistent feel with the device you use to seat primers and that can easily be monitored. Squaring them gets rid of any curvature along the inside bottom outside edge of the primer pocket and it makes cleaning up the holes easier after each time the rounds are fired.
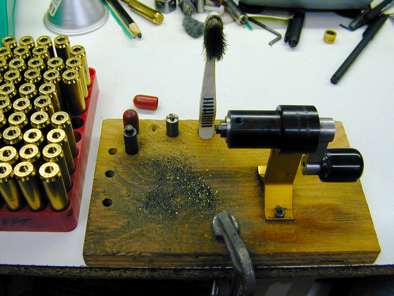
The tool I use is a hand tool which many reloaders mount in a cordless drill or screwdriver. The screwdriver types don’t revolve as fast when compared to the drill types. I don’t use either of these methods. I prefer mounting the primer pocket squarer on a small fixture you can get from Wilson. I’ve mounted that fixture on a small square block of wood, which I clamp to my loading bench so the unit doesn’t move around when you push the case up against the cutting blades. I turn the crank slowly to remove any material needed. You get a good feel being transmitted to your fingers turning the crank. You can go as fast or as slow as you want. In any case hand cranking is slower and more controllable than either fitting the cutting head on an electric screwdriver or cordless drill.
The primer pocket squarer does double duty in the sense that I also use it to clean the pockets on fired cases before seating new primers.
I have noticed that the amount of burnt residue left behind from igniting varies. Some have a lot of residue while other have just a little bit. So if you left this residue in the pocket when you go to seat a new primer some are going to seat differently.
There is absolutely no question that inconsistent reloading will affect where you’re shots print on the target face. So doing everything consistently the same is simply the smart thing to do.
Further to squaring the pockets here’s an exerpt from a well known site on the web…http://www.exte riorballistics.com/reloadbasics/caseinspect.cfm
Primer pockets should be inspected twice; first when the fired cases are examined, and again after the case has been resized and decapped. Although they will very rarely show any signs of overt failure, the pocket should be monitored closely nonetheless. When inspecting the fired case with the spent primer still in place, note the condition of the fired primer. Is it badly flattened or cratered? Did it leak any gas in the last firing? Check the small radius at the mouth of the pocket for signs of leakage, which will appear as sooty smudge on the case head. This may indicate a point at which the pocket has allowed gas to escape, due to an excessively hot load or some irregularity in the primer pocket. Regardless of the cause, once such a leak has occurred the case is finished. Destroy it, and throw it away. After the spent primer has been removed, usually during the sizing operation, re-examine the primer pocket. Inspect the web area, and the flash hole for any burrs or obstructions. These can usually be easily removed, and the case returned to service.
There are dozens of techniques for preparing match brass for competitions. Some techniques are well known while others remain relatively unknown.
I’ve pretty well always practiced the technique of squaring primer pockets on new cases that I’m prepping for matches or competition. It’s an external process easily done on any caliber case body. The tools required aren’t expensive. Depending on the manufacturer of the case when primer pockets are originally formed they can be either straight or slightly off angle. Punches dull over time and if they are not routinely replaced a small amount of radius begins to form on the punch head after stamping out thousands of cases. This radius is transferred to the bottom corners around the circumference of the pocket. If the primer pockets are consistently the same from case to case then I don’t believe you’ve got much of a problem. If there are minute changes that might be hard to see with a simple visual inspection when you go to seat the primers there might be a variance in how deep they are seated. Or worse they are seated at a slight angle that goes undetected.
Most primers have three legs on the anvils that hold the priming mixture in place. If they aren’t all fully flush against the bottom of the pocket there could be a change in the way they fire or light off. If a primer is seated high, when the firing pin strikes, the primer is pushed forward a little until it rests on the bottom of the primer pocket hole before it ignites.
In automatic type rifles a high primer is not a good thing because they could cause a slam fire. Generally autos aren’t used in f-class so if your interested in discovering what a slam fire is… Google it.
Most of the guys I know shooting f-class use single shot bolt action rifles. Still I believe it’s a good idea that the primer sits a fraction of a space below the top surface of the case head. The amount of depth I don’t believe is a big deal with the exception of cutting the primer pocket too deep. This could inadvertently happen with the tool having an adjustable cutting head. Some tools are configured in this fashion with a set screw so you can move the cutter in and out. You have to make sure you don’t cut them deeper than the length of you’re firing pin projection through the bolt face. In other words if you cut them too deep your firing pin may not strike or hit them. You can visually inspect seated primers. You can physically run your finger over the bottom of the case to feel the indentation or you can sit them upright on a flat surface to help discover any improperly seated primers.
I square them up because it gives a consistent feel with the device you use to seat primers and that can easily be monitored. Squaring them gets rid of any curvature along the inside bottom outside edge of the primer pocket and it makes cleaning up the holes easier after each time the rounds are fired.
The tool I use is a hand tool which many reloaders mount in a cordless drill or screwdriver. The screwdriver types don’t revolve as fast when compared to the drill types. I don’t use either of these methods. I prefer mounting the primer pocket squarer on a small fixture you can get from Wilson. I’ve mounted that fixture on a small square block of wood, which I clamp to my loading bench so the unit doesn’t move around when you push the case up against the cutting blades. I turn the crank slowly to remove any material needed. You get a good feel being transmitted to your fingers turning the crank. You can go as fast or as slow as you want. In any case hand cranking is slower and more controllable than either fitting the cutting head on an electric screwdriver or cordless drill.
The primer pocket squarer does double duty in the sense that I also use it to clean the pockets on fired cases before seating new primers.
I have noticed that the amount of burnt residue left behind from igniting varies. Some have a lot of residue while other have just a little bit. So if you left this residue in the pocket when you go to seat a new primer some are going to seat differently.
There is absolutely no question that inconsistent reloading will affect where you’re shots print on the target face. So doing everything consistently the same is simply the smart thing to do.
Further to squaring the pockets here’s an exerpt from a well known site on the web…http://www.exte riorballistics.com/reloadbasics/caseinspect.cfm
Primer pockets should be inspected twice; first when the fired cases are examined, and again after the case has been resized and decapped. Although they will very rarely show any signs of overt failure, the pocket should be monitored closely nonetheless. When inspecting the fired case with the spent primer still in place, note the condition of the fired primer. Is it badly flattened or cratered? Did it leak any gas in the last firing? Check the small radius at the mouth of the pocket for signs of leakage, which will appear as sooty smudge on the case head. This may indicate a point at which the pocket has allowed gas to escape, due to an excessively hot load or some irregularity in the primer pocket. Regardless of the cause, once such a leak has occurred the case is finished. Destroy it, and throw it away. After the spent primer has been removed, usually during the sizing operation, re-examine the primer pocket. Inspect the web area, and the flash hole for any burrs or obstructions. These can usually be easily removed, and the case returned to service.
To use the uniformer you need a sleeve that
fits around it and then you insert both into the Forster fixture.
Sinclair International has all of the parts.
Seems ever time I clean up the pockets there a
few brass flakes or chips found in the burnt priming debris. I've
never worried about it.