Target
Marking
It’s amazing the number of times I’ve revised this document trying to include as many of the aspects of what goes on or what should be going on down in the pits by the targets during shoots. Originally I called it the “But But of Butt Duty” and it was sort of a document that went off on several different tangents, complicated as complicated gets. Well here’s another stab at it or another complication!
In Ontario we generally have paid marking for most of our competitions. Heck I can’t remember the last time I did marking for a match. I’ve been shooting long range competitions for more than five years now and during this time there’s been so many discussions on the value of good pit service I’ve lost count. Quite a number of the shooters I’ve talked about the subject feel it’s absolutely critical. They say if you get a slow marker or someone down in the butts who doesn’t have a handle on what they’re doing it will affect the outcome of their scores. Well, I think all of us at some point have experienced good marking and bad marking and can pretty well tell the difference between the two. Might I add it seems worse when you’ve dropped a bunch of points?
For those who are relatively new and not up to speed yet, butt duty or target marking involves goes down to the butts and marking targets. We generally call this area the butts, or “down in the butts” but it’s a bit of a misnomer. The paper targets mounted on frames are held in place by some ingenious types of devices. Some target holder designs are better than other and some from what I’ve heard really suck! I don’t know whether ours are good, bad or ugly I just know they generally work and anyway we really don’t have a choice as they’re property of the respective military ranges. A few of the target frames might be in need of some minor repair but generally most of them work pretty good. They go up and they go down. We’re lucky in another respect in that all the ranges we shoot on have well protect earth covered cement pit areas below ground.
It’s not a good idea to refuse butt duty if requested unless you have a pretty good reason like a medical problem or something. “I simply don’t want to,” just isn’t going to fly. In some cases I suppose if you were asked during a match you risk being disqualified if you refuse. So cheerfully accept the responsibility and get on with it, but for the most part we do have paid marking. The match organizer for our shoots put a lot of effect into securing enough paid markers to make our events flow smoothly.
If you ever end up down there you should be focusing on providing the best possible marking service you can for the shooters back on the firing line. Butt duty is not some kind of social event. You need to take it seriously. Just keep one simple thing in mind and you’ll do just fine. Suppose it was you back on the firing line how would you like your target to be pulled and scored? It’s really as simple at that!
Safety is important in any of the shooting disciplines. While you are in the pits, you are standing and moving about in an area where just above your head bullets are going to come whizzing over, hopefully strike the target, past through them and end up in the sand or dirt backstop behind the target. When you think about it, this is actually the safest area on the range because you are below ground and very well protected! When you enter this area you cannot leave it under any circumstances until the Range Safety Officers clear the range as being safe. There’s one RSO down range with the shooters and one RSO in the butt area and they are in contact with each other during live firing using wireless radios. Only when they tell you its safe are you able to come out the pit area. We use a two flag system. On the firing line and down in the butt area there are two flags used that indicate the condition of the range. When the green flags are flying it means there are no rifles on the firing line and the range is safe. When the flags are changed to red at both ends it means the range is now live or hot and that live firing is taking place on the range. So long as you stay down in the pits you are safe and well protected from any live firing.
When you arrive at the butts you should find out which target you have been assigned to pull and go there. The first thing to check is to make sure you have enough of the right size orange fluorescent shot markers and scoring indicators. They come in 3 sizes. You need to use the smallest ones on the short range targets and the medium ones on the medium range targets and the larger ones on the long range targets, simple enough eh? If you were to use a large disk on a 300 yard target and there was a shot in the v-bull it would be hard for the shooter to see exactly where in the V their shot hit. Make sure you have enough of the indicators, that they are in good shape, that they are not riddled with bullet holes, or have the projection missing that you insert into the holes on the target or that they are not badly cracked from being hit a number of times. If they do have bullet holes in them don’t use them! Get new ones. The same rule applies while the match is in progress. If you’re scoring for an exceptional shooter the odds are very high that they are going to be drilling and chasing that spotter over the target and it’s not just the good shooters. Conditions may be such on the range, the day you’re marking that the average shooter is able to keep a fair number of their shots in or close to the bullseye. They too will also put shots directly into these orange markers. This is especially true if you’re marking targets which are being fired at from the shorter 300 yard firing point. Though the rings and V-bull area are smaller on these targets because of the shorter distance the indicator is likely to be hit more. You need to pay more attention when something like this is going on because the odds of missing a shot because it passed through the indicator is higher.
In Canada we generally shoot two up or pairs and sometimes three up. This means on the firing line you are looking after two or more shooters in succession shooting at the target you’re assigned to. It’s rare that you will pull and mark for one shooter only, this can happen during a practice, but even then we try to have more than one shooter practicing on a shooting position. So organize yourself in the pits quickly. Check for the orange disks, the black and beige patches and when you satisfied you are ready, stand facing the target and wait for the show to start.
If you’re marking long range targets you’ll notice that it’s very large and so is the wooden frame that holding it. You might think gosh that thing is going to be a real chore to pull down and push back up. These large frames actually go up and down smoothly when they are properly balanced with counterweights. If you find it’s still unbalanced you can adjust it yourself by adding or removing the weights. Counterweights can be found in the target sheds or if you’re lucky you might find one nearby on the cement floor of the pit. Another minor annoyance is making sure the wedges holding the legs of the frames securely in place down near the bottom and put behind the target forcing the whole frame forward. If you put them in the front the frame leans backwards and gets caught on the framework when you raise the target.
Once everyone is organized in the pits, all the targets are pulled down. This is another indicator to the shooters back on the firing line the relay is about to begin. You should do a final check to make absolutely sure all the holes have been patched out in the target. The targets will be kept down for a minute or two, so it’s a great opportunity for this last minute check. Then you’ll raise your target in concert with all the others on command from the Butt RSO. Please be ready for this. When the targets are fully raised shots will start coming downrange for the duration of the relay. Relays can vary in length of time and in the total number of shots fired. For example you should have any idea of how many rounds each shooter will fire. Generally it’s 2 sighters and 10, 15 or 20 shots for score. It could also be a relay with unlimited sighters and the same 10, 15 or 20 shots for score! It all depends on how the match was pre-organized. It’s not that you need to know specifically the number of shots the shooters are taking it’s simply to give you an idea of the length of time of your marking session. 20 shots are going to take more time than 10, right? I would say it’s double the time but certainly longer than just 10 shots coming downrange.
It may happen very quickly or it may take a few minutes before someone shoots at your target. It depends on how organized the shooters are back on the firing line. Technically they should all be good to go once the match has started. They all were given a certain number of minutes to prep themselves and their shooting position and the RSO does ask if anybody needs more time. But sometimes it takes a few minutes before things start to happen or the squadding is changed at the last minute. If you’re new there is a tendency to glare up at the target, looking all over it, anticipating a bullet strike somewhere. I don’t recommend scanning the target like this, depending on lighting conditions and weather it’s difficult to see the bullet holes from the angle you are looking up at. The best method is to stare at the sand or dirt backstop where the bullets will impact. You’ll hear a distinct snap over your head and then see the bullet strike the dirt or sand. That snap or sonic crack is a good indicator that a bullet has hit the target you’re pulling. If you see a bullet splash but don’t hear it, it’s quite possible that one of the shooters is firing a subsonic load. If it were a good load the bullet will stay supersonic and hence you’ll hear the snap. Well this point might be debatable as we do have instances where Black Powder guys shoot the long ranges and if anybody’s going to be subsonic it’s their shots. One thing for sure it the hit the target you aren’t going to have any trouble finding those holes, that’s for sure!
While working in the pits you have to wear eye protection and a helmet. You should also have hearing protection with you and make sure you bring some kind of drink or fluids down in the pits… You’re in there marking for a while. On hot days and because it’s physical you’ll get thirsty sooner. If you see splashes but don’t hear the crack, time permitting you should tell the range officer that the shooter is shooting subsonic ammunition or loads. Not so much the Black Powder guys they already know. It’s done as a courtesy for the technically high power centrefire shooters. The tendency for subsonic hits is more likely to happen in practices because that’s when new loads are checked. It let’s them know their load isn’t working, what they eventually do about it is up to them. The bullet impact area is a distance back behind the targets but the timing of the crack and splash may be almost simultaneous. The point I’m making is that when you hear the crack and see the splash immediately pull the target down and look for the bullet hole. It’s important you bring down as soon as possible after the shot. It let’s the shooter know you are on the ball and paying attention. Scan for the bullet hole working from the V-bull area to the outside area of the target. Once you’ve located it put an orange indicator disk into the bullet hole and as you’re doing this note the value of the shot. Then indicate the correct value for the hit in the correct along the frames’ edges. Once you’ve done this immediately raise the target for the next shot. Make sure the target comes to rest at its highest point and don’t move it once it comes to rest. Use good judgment with regards to how the target comes to rest. It should not be banging into the stops at the upper or lower positions. Return to looking at or scanning the dirt or sand directly behind YOUR target. Avoid getting into any type of conversation that’s not directly related to scoring the target you’ve been assigned to. If you do you’ll get out of sync with the shooters. Naturally, If you need help you’ll have to ask a question to get it and you could get out of sync at that point. If you watch some of the good target pullers you’ll be amazed at how fast they do their marking. With less delays your going to be out of there sooner!
As far as I’m concerned the fastest guy on the planet is Gill Vamplew. This young man can mark your target so fast that if you’re not watching closely through your rifle or spotting scope you’d think the target never went down! No kidding the target doesn’t stop moving. You see it starting to go down, reverse and it’s back up almost in one motion with your shot marked and the value indicated. Pat his dad said he learned how to do this while they were in England at Bisley. Well Gill you learned it right! If the sand or dirt is dry on the backstop you’ll see the bullet splash clearly. If it’s damp or wet then it will be a little more difficult to see the splash If there’s vegetation covering the backstop it will be very difficult or much harder to see the bullet strike. Keep your eyes focused on the sand or dirt because it’s the best indicator you’ve got to help you figure out where the bullet hit the target. Most of the time you can easily recognize a little depression dug into the sand. This is the central area of the target. So if the bullet strikes in this area then it’s going to be a shot that passed through the target close to the bullseye. When you pull the target down that’s the first place you should look or check. You can readily tell after a few shots exactly where they’re going by these bullet strikes into the backstop. If the strike is high and to the right, then you’re looking for a bullet hole high and right of the bullseye on the target, if the strike was low and to the left, then the bullet hole will be low and to the left. This saves your eyes from fatiguing looking all over the target face for a hit. If you don’t pay attention to these splashes you won’t have any idea where the bullets are hitting and you’ll spend extra time trying to find the hole when you pull the target down.
Something can happen where a bullet hits the wooden frame portion of the target and all bets are off of where that bullet is going to impact in the butt area. In this case where it hits is not going to be an indicator of where it might have struck the target.
You’ll get into a good rhythm quickly enough. If you are marking for a bunch of shooters who are exceptional and we do have a few of them here in Canada it’s super easy cause most of their strikes will be in the bullseye or better still the V-bull and you’ll recognize this readily enough from where all the splashes are occurring. If the shooter is constantly hitting the V you get a bonus in that you don’t have to move the shot indicator disk. If the shooter is throwing shots all over the place there could be a number of reasons as to why this is happening, their load might be too light for the distance they might not have set their sights set to the correct zeroes for elevation, they turned the windage knob left when they wanted to go right, the new shooter or the not so new shooter is having a bad day and simply sucks or Apollo is pissed with Zeus!
So this is where you can really shine by paying attention to where their shot splashes in the butts. You can help them to get on target quickly if asked to do so by the Butt RSO. The Butt RSO might ask you where the shot is going if you send the target up clean with no indicators meaning they’re not on paper. he generally does this based on radio contact from the RSO down at the firing line who is relaying the request from the target shooter who fired the shot. Are you going to be able to tell them anything?
With TR shooters because they aren’t using rifle scopes, just spotting scopes, they don’t ever get to really see the splash themselves unless they’re in close as in 300 yards or someone on the line is spotting for them through a spotting scope. If it’s an f-class shooter they would be more than likely using the scope mounted on their rifle. On hot days with heavy mirage it’s very difficult for shooters to see splashes from the firing line looking through scopes. So you can help a lot in this regard. On wet days it’s also hard to see the splash because it doesn’t kick up as much. What I’m trying to indicate to you is that you need to keep paying attention because you may be asked to report on where the shot hit in the backstop. If you are not paying attention then you can’t answer that question, right?
One of the things you have to be extremely careful of is shots you can’t find. If you were paying attention you saw the splash, but when you pulled the target down you can’t find a bullet hole quickly. First thing to do is check the spotting disk. Does it have a hole in it? The shooter may have nailed the spotting disk. You’ll quickly learn if the shooter’s have a good run at the target because of where they’re placing their shots. If the shooting is fairly centered on the bullseye, first you hear the crack, see the splash, pull the target down, and you can’t find it, immediately check the orange disk for a hit. Lift it out and check closely on the target for a new hole. Patch the hole you took the disk out of, NOT THE NEW HOLE! Re-examine the disk and if there’s only one nice clean hole in the disk it can be patched and reused. If it’s cracked, get rid of it, don’t re-use, get another new disk. The orange indicators we use have two projections, one on each side of the disk and it’s these projections that you insert into the holes. Examine them carefully and make sure they are useable and not bent out of shape or sheared off. Depending on what caliber is being shot the disk may be easy to insert into the hole or it may not. If the shooter is shooting a Palma bullet which is a 155 grain Sierra MatchKing™ in than you will have no problems getting the disk into the bullet hole. If it’s a 7mm WSM like Norm Barber shoots again no problems. If they’re shooting the .223 caliber like Jim Thomson then you may have trouble forcing the disk into the hole. I’ve used “golf tees” to widen the holes. If you do have to force the disk in eventually the projections weaken and bend and it becomes impossible to get the disk in properly and this delays you from running the target back up. If the disk is not secured properly in the hole when you send the target up it falls off and then you have to pull the target down and fix things. This is another distraction and delay to the shooter. The composition of our backstops is what’s commonly referred to as Cloroplast™. It’s some kind of plastic type paper that’s very weather resistant especially against rain. It’s very light and doesn’t get ripped to shreds when bullets pass through it. Actually after the bullet passes through the holes shrink a little! It’s the same stuff that hip real estate people are using for their signs. But after prolonged exposure to many bullet hits the centers do get shot out and it becomes more difficult for the indictors to stay in the target.
A word on patches, we use two types, black and beige. It should be self-evident which ones are used where on the target. The black ones are used in the black areas of the target and the beige ones in the light or white areas of the target. Our patches are roughly an inch square. Actually I’ve always thought they’re too darn big for our purposes! They can be split in half or quartered and still cover the bullet hole completely. Try to use them in this fashion. I’ve seen some smaller round ones but I have no idea who’s using them down there, but their kool! When patching the v-bull area on a target try to avoid patching out the rings or circles that indicate the border between the different values. Shooters with 36x power scopes can see these rings especially from the 300 yard line and they don’t like them being patched out needlessly. For the shooter it gets to the point where they can’t see the v-bull area at all and when that happens they can ask for a new face to be put on the target. You still need to cover the hole but use your common sense here. Don’t use a beige patch to cover a bullet hole in the black area of a target because it becomes a distraction for the shooter at close ranges. Nobody I know can see them at the 1000 yard line. But you might as well stay consistent with what you are doing. This usually happens when a puller runs out of one of the correct colours so they use the wrong patch. They generally aren’t doing this on purpose, they just simply find themselves short of the correct ones and think it’s okay to use the other colour. Now you know the reason why you shouldn’t.
You may also be asked to staple a new face on the target if the shooters are constantly hitting the v-bull area. In these cases it’s almost impossible to avoid filling in the border lines on a 300 yard target which is 2.75 inches in diameter. Knowing where the new faces are kept for this purpose would speed up the time that the target is down for a new face. Make sure you’re using the right face for the distance being shot at. If you’re unsure ask someone who has experience in this area.
When patching, be very careful that you DO NOT PATCH OUT THE NEW HOLE. It’s very easy to get confused if you are not paying attention. You patch the hole that the shot indicator disk was in not the NEW HOLE from the current bullet strike. This is likely to occur when a shooter is constantly hammering the v-bull area because the holes are very close to each other. The idea of target pulling really is to get into a rhythm with the shooters. There may be times when things lull a bit and you’re wondering why it’s taking a long time. Think like the shooter. They might be doping the wind or waiting for a certain condition to occur before they’ll take their shot. Be patient it will come down range. You may get a feeling from what’s happening on other targets to your left and right… sometimes it gets quiet for a few seconds and then there’s several shots coming down range from shooters who are shooting that particular condition unitl they run out of time (45 seconds). There will be times when two shots arrive at the same time and you think it might be yours and you prematurely pull the target down and then the RSO comes over and tells you that they’re wondering what your doing pulling the target down when the shooter hasn’t taken a shot. This can and does happen but it would happen a whole lot less if you’re watching and paying attention for the splash.
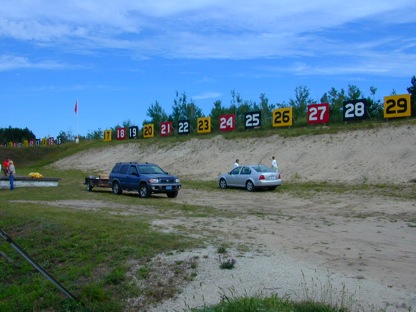
The sand butt at the Mons Range Camp Borden. You can see how large the target number boards are. Back at the 1000 yard line it doesn't look so big!
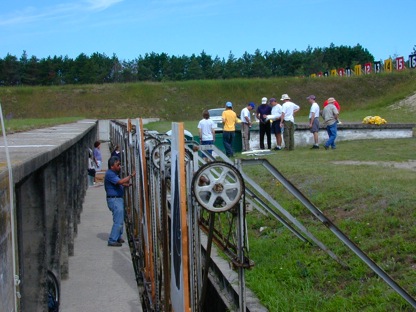
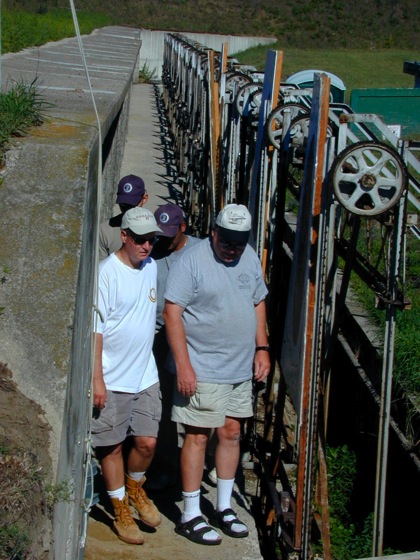
Pit Alley: This is where the target markers spend their time during matches. Notice the height of the ceiling in the cement dugout. You can see how well protected the area is.Bullets would be coming from the left to right, passing over the ceiling of the pits, impact the target and continue until they hit the sand butts off to the right which aren’t shown here.but they are in the photo above this one.
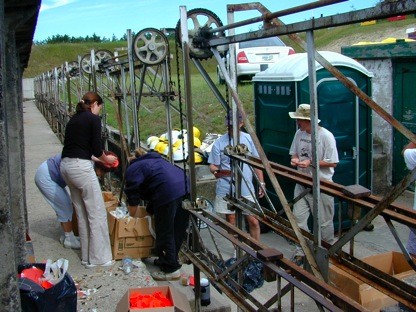
Sorting of the beige and black patches. In the foreground you can see a garbage bag of shot indicators that are being thrown out because they have too many holes in them, are cracked or have missing projections for inserting into the bullets holes in the targets. There is a portable toilet in the pits which comes in handy. You also get an idea of the mechanical targets frames used to raise the targets up and down.
Here you can see the rear angled target braces which go pretty deep into the ground. Those frames are pretty stable even in some pretty good wind conditions. They have to be because the 1000 yard target frames are quite large. The mass of the large target frames provide a lot of resistance to strong wind.
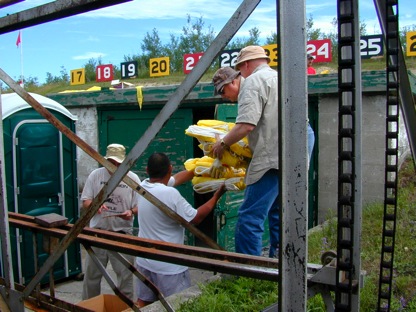
The photos on this page were taken during Target Day in the summer of 2005. You can see the yellow ranges flags being sorted and folded. There are two types. One set is made of cotton and are heavier. These cotton flags are similar to the ones used on the Bisley ranges in England. The other type is made out of a lighter fabric. When shooting you need to know which is up because there is quite a difference between the two in how each reacts to the wind.
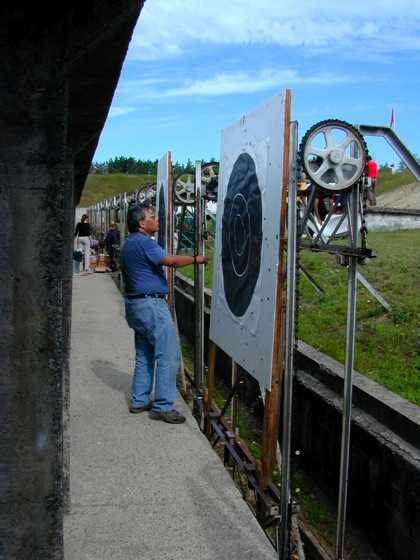
Mike Chung is inspecting the target face for bullet holes and patching them out. This is the long range frame. It’s the largest of the two we use.
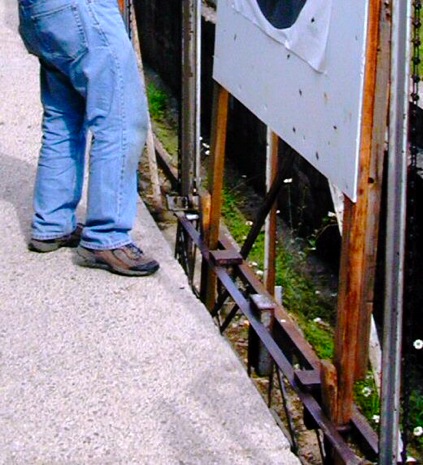
There too many counterweights in the front part of the frame. Three are shown. One large one in the center and two smaller and lighter ones on each end in between the target frame legs. Some of them should be moved to the rear which would balance the target frame to the holder better. Also note that the wedges were put in the front of the legs. This might work with the large frame targets but with the smaller ones it forces the wooden frame backwards and this causes the frame to catch hang-up on the upper parts of the metal framework behind them. Positioning the pegs behind the legs works better because it forces the target to lean forward toward you.
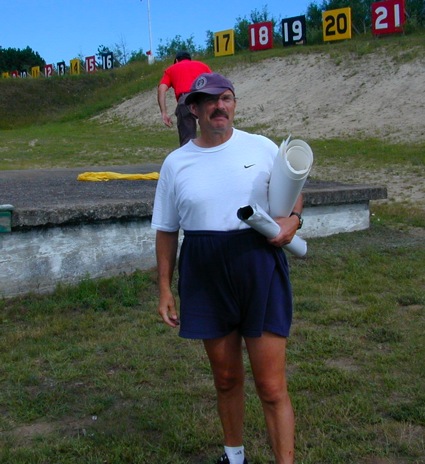
Mr. V-Bull... Pat Vamplew an excellent TR shooter sporting a new way to wear shorts... PAT at least shoots better than he dresses!
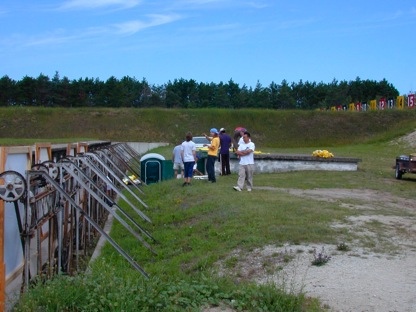
Another view showing the clearance of the brow of the cement pits... it’s more than this photo shows. See the one above with Mike Chung.
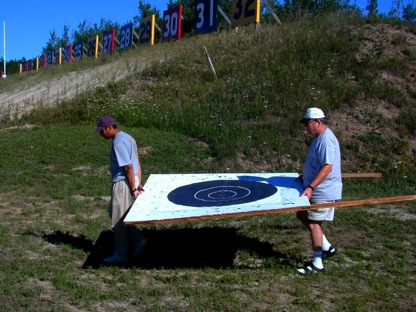
Fazal and Jim carrying large target to pits for an afternoon practice. We get to shoot once the clean-up is done!
The following messages are in common usage in Canada and are copied from the Dominion of Canada Rilfe Association, Rules for the Conduct of Fullbore Rifle Competitons. February 2003 Edition 10. If they are new to you it might be a good idea to copy them down and have them handy in the pits with you until you know them.
3.18 Range Messages
(1) The following code messages will be used for communication between ROs and the Butts by any means. All replies to messages indicated with a double asterisk (**) must be confirmed by radio in addition to visual signals where applicable.
Message Meaning
1 "Firing about to commence."
2 "No spotting disc visible." **
3 "Spotting disc unmistakably disagrees with signalled value. Check that spotting disc shows LAST hit and signal its correct value." **
4 "A shot has been fired but no signal has been made. Examine target carefully and signal the hit, if found, or a miss." **
5 "The firer has challenged for a higher value for his hit. Check the value of the shot signalled, using a gauge if necessary, and examine the target for any other hit. Signal the correct value of the highest scoring hit found)." **
6 "Radio the hits, as score board figures are not clear." (NB: used only in Service Rifle events).
7 "A miss has been signalled but firer has challenged for a hit. Re-examine the target and the spotting disc carefully and signal the hit, if found, or a miss (see also Rule 3.02(3)). Confirm the result by radio." **
8 "The firer has challenged his score. Re-examine the target and confirm by radio the correct number and value of the hits." (NB: used only in Service Rifle events).
9 "Marking/Shooting appears to be unduly slow. Butt/Firing Point Officer is to check and correct as necessary." (NOTE: This message may be passed in either direction)."
One last thing along with your hearing and eye protection you should have some type of refreshment with you while you spend time in the butts. I mentioned this earlier but it’s important. On most of our ranges we also have portable washrooms in these areas. Depending on the weather you should also have appropriate clothing to wear. And remember you can not leave this area until the flags are flying green and the RSO tells you can leave.
Usually at the end of a string the shooters before leaving the line will let the markers know how well they did by saying to the RSO something like, “compliments to the marker” or double compliments. This is indication that you’ve done a good job for them. It would also be nice it the shooters in return would also inform the RSO who relays the message to the Butt RSO that they have finished shooting the string and that target can be rested or brought down. There’s no point in having someone standing in front of a target that’s no longer in use.
I talked about hearing protection in this article and I know someone will question the viability of it. If you’re wearing hearing protection how are you going to hear the snap or crack of the bullet then? Well I guess it really depends on how much noise your particular hearing protection cuts out. Some of the electronic types are very good at letting you initially hear a bit of the shot or snap and when it reaches a certain level cancels it out. Others have lower decibel ratings and some are quite high so yes it’s possible that with wearing hearing protection you could miss the sonic crack or snap. In regards to eye protection, wear it period!